You must use the Sysprep /generalize command to generalize a complete Windows installation before you can use the installation for deployment to a new computer, whether you use imaging, hard disk duplication, or another method. Moving or copying a Windows image to a different computer without running the Sysprep /generalize command is not supported.
Warning
Using this method causes Windows 7 to lose all activation information, and it needs to be reactivated afterwards. If your Windows 7 is an OEM version, you might not be able to reactivate it, at least not without phone activation option.
I do not recommend to use this method on RAID systems. All experiments on RAID I know have failed.
Warning
An upgraded Windows cannot be sysprepped. As this method is based in sysprepping, this tutorial is valid only for Windows setups which have not been upgraded.
This means that if you have for instance in-place upgraded Vista to Seven, or using Anytime Upgradeupgraded for instance a Home Premium to Ultimate, you cannot sysprep and this tutorial cannot be used in your case.
Notice that a repair install is also an upgrade install, so if you have ever done a repair install (= in-place upgrade to same edition), you cannot sysprep.
PLEASE DO NOT FORGET TO CREATE A SYSTEM IMAGE BEFORE PROCEEDING!
As you can read on this thread, on rare occasions this method does not work. If this happens, you can always restore your system using your backup image.
Changing hardware components but keeping old hard disk(s)
Use this method if you: - Change other hardware components but keep your old HD containing Windows 7 - Move the HD containing Windows 7 to another computer
Before installing new hardware, boot Windows 7 normally
Disconnect all external hardware except mouse, keyboard and main display. If your system folders are located only on C: drive, disconnect all other hard disks except that containing the C:. In case of relocated system folders, for instance the profile folder Users located in another drive and other system folders on C:, first move the relocated system folders back to C: then disconnect all other drives. Reboot after this
Run Command Prompt as administrator .
.
Type to Command Prompt: %windir%\System32\Sysprep\Sysprep.exe, and hit Enter . .
In sysprep dialog that opens, choose System Cleanup Action as Enter System Out-of-Box-Experience (OOBE), selectGeneralize, select Shutdown OptionsShutdown. Click OK .
.
Sysprep generalizes now your Windows 7 setup and shuts down your computer. Do not run any other programs during this phase! .
.
.
Switch the main power of your PC off and install the new hardware OR dismount the hard disk(s) and mount it (them) to a new computer
Boot the PC from sysprep generalized hard disk. You will notice Windows booting as if it was the first boot after installation, installing default drivers and updating registry. One or two reboots are needed, depending on your system specifications .
.
.
.
When Windows finally boots up, you will need to enter all information as if this really was a new, fresh installation .
.
Because your old user profiles already exist, Windows does not accept your normal username, but instead you have to create a new temporary user. I use username Test for this purpose .
.
When login screen appears, choose your old user account to login .
.
Windows boots now to default OOBE first boot desktop, with default 800*600 resolution and default theme. All your installed applications are there, as well as your old user profiles and folders. Windows has installed the default drivers for your setup, you can update them if needed . .
Go to Control Panel > User Accounts and delete the temporary user account (in this case Test) that you just created
METHOD TWO
Change the hard disk(s) or move Windows 7 setup to a new computer using third party imaging software
Use this method if you: - Replace the HD containing Windows 7 on your old computer - Move Windows 7 to a new HD on another computer
Follow steps 1 through 5 above (method 1)
Boot PC with an imaging CD/DVD (Paragon, Macrium etc.). Here's a tutorial for imaging with Macrium Free: Imaging with free Macrium
Create an image of your system
Turn PC off, change the hard disk(s) and reboot with imaging application, restoring the image OR boot the new computer with imaging software and restore the image
Continue from step 7 above (method 1)
This procedure is failsafe, and works every time. There is nothing to worry, but of course it is recommended to make a backup before trying this. I have even used this method when some serious driver issues caused the PC to constantly crash (BSOD), to reset all drivers to Windows defaults and then reinstalling them one by one to find the culprit.
Note
What does Sysprep generalizing do to my Windows 7 setup?
All system specific information is removed or uninstalled
Security ID (SID) of your hardware setup is reseted
All system restore points are deleted
All event logs are deleted
All personalization is removed (taskbar, toolbars, folder options, start orb etc.)
Built-in administrator account is disabled (if it was enabled) and needs to be re-enabled if needed
What happens when booting first time after sysprep generalizing?
First boot configuration is run
New SID is created
Re-arm counter is reseted if not already re-armed three times
Windows 7 is booted using first boot default drivers and settings
I have tested all above mentioned methods with all versions of Windows 7, from Starter to Enterprise. It works every time, with one exception: for reasons unknown to me, sysprep seems sometimes dislike Windows Media Player networking service, which is by default started every time Windows 7 starts. In about every third time I've done this, I've got an error message when trying to generalize:
However, this is not a big problem. You just need to stop the WMP networking service, and run sysprep with generalize option again. You can stop the service in question by typing net stop WMPNetworkSvc to command prompt, and hitting Enter:
If you have any questions, do not hesitate to ask.
Happy computing!
Kari
EDIT: A Useful tip from xxxwea, as later confirmed by Victor:
Quote: Originally Posted by Victor S
Kari, just a suggestion.
You might note in the tutorial that if on first booting Windows can't finish configuring, a reboot into safe mode, then a normal reboot will allow it to finish successfully.
This has happened to me both times I used a sysprepped system drive in a new computer. I found the answer to this problemburied deep in this thread the first time I ran into it, and the same thing happened yesterday on a different computer.
It's a seemingly very silly solution, but it works. I do believe many people have abandoned their sysprep work when they encounter the problem.
Problem : When starting windows an error message displays C:\ Recycle Bin corrupt or D:\ Recycle Bin corrupt. This also appears when deleting files or sending files to the recycle bin. Click on recycle bin and you see no files at all.
There is a hidden folder C:\ $Recycle.Bin or D:\ $Recycle.Bin that is the root cause of this problem and needs to be deleted. . Solution 1 Manual Fix 1. On the desktop click on Computer
2. Click on Organize on the top left menu then Folder and Search Options and open the Folder Options Window
3. Click on the View tab and check the Show hidden files, folders and drives click Apply and Ok. *This will display the hidden folder $Recycle.Bin when you click on your C:\ or D:\ drive
4. Locate and right click on the $Recycle.Bin folder and rename it to corrupt or anything else. Right click on corrupt and delete it.
Must rename $Recycle.Bin before deleting or it may continue throwing errors like Denied access or when you think it is deleted you see its still in your C:\ or D:\ drive or it passes the same errors to other systems on your network.
5. Go and refresh your desktop and your errors should be removed. Should now be able to use recycle bin normally.
The post states that it works for Windows 7 64 bit but I also tried it on Windows 8.1 64 bit and it worked great. My problem though was that I deleted some files and folders form within an encrypted folder and for some strange reason, some of the folders could not be removed from the recycle bin. The above solution worked perfectly.
The TESTSIGNING boot configuration option determines whether Windows Vista and later versions of Windows will load any type of test-signed kernel-mode code. This option is not set by default, which means test-signed kernel-mode drivers will not load by default on 64-bit versions of Windows Vista and later versions of Windows.
Note For 64-bit versions of Windows Vista and later versions of Windows, the kernel-mode code signing policy requires that all kernel-mode code have a digital signature. However, in most cases, an unsigned driver can be installed and loaded on 32-bit versions of Windows Vista and later versions of Windows. For more information, see Kernel-Mode Code Signing Policy (Windows Vista and Later).
The TESTSIGNING boot configuration option is enabled or disabled through the BCDEdit command. To enable test-signing, use the following BCDEdit command:
Bcdedit.exe -set TESTSIGNING ON
To disable test-signing, use the following BCDEdit command:
Bcdedit.exe -set TESTSIGNING OFF
Note 1: If the above command doesn't work, run this command first "bcdedit.exe -set loadoptions ENABLE_INTEGRITY_CHECKS" and then run the OFF command Note 2: After you change the TESTSIGNING boot configuration option, restart the computer for the change to take effect.
To use BCDEdit, you must be a member of the Administrators group on the system and run the command from an elevated command prompt. To open an elevated Command Prompt window, create a desktop shortcut to Cmd.exe, right-click the Cmd.exe shortcut, and select Run as administrator.
The following screen shot shows the result of using the BCDEdit command-line tool to enable test-signing.
When the BCDEdit option for test-signing is enabled, Windows does the following:
Displays a watermark with the text "Test Mode" in all four corners of the desktop, to remind users the system has test-signing enabled.
Note Starting with Windows 7, Windows displays this watermark only in the lower left-hand corner of the desktop.
The operating system loader and the kernel load drivers that are signed by any certificate. The certificate validation is not required to chain up to a trusted root certification authority. However, each driver image file must have a digital signature.
Have you ever encountered an infinite reboot loop?
You would probably recall if you have. It is instantly recognisable by the failure of Windows to correctly load up after switching on your PC or laptop. Instead, the computer will reach a certain stage before the logon screen only to then reset back to the boot screen, at which point it will attempt to load Windows again, becoming caught in the loop (although in some cases it might successfully boot) again and again.
The error occurs because of a problem with the Windows 7 system registry. Unfortunately without booting into Windows the registry cannot be fixed, leaving the operating system unreachable.
It’s a Catch 22 situation.
In order to overcome this problem, the tools provided in the Windows 7 System Recovery Options can be used.
Booting Into the System Recovery Options Screen
First you will need to boot your computer into the System Recovery Options screen. This is usually done with the installation DVD, which should be inserted into the optical drive. When the computer boots, Press any key to boot from CD or DVD as requested, select your language preference and then click Repair your computer. A list of installed operating systems should be displayed – select Windows 7 and click Next.
The System Recovery Options screen will appear. Select the first option, Use recovery tools that can help fix problems with Windows, and then select Startup Repair.
(If your computer has a pre-installed recovery partition, the process is a little difference. In this case, boot to the Advanced Boot Options screen, select Repair your computer and tap Enter. Next, select the keyboard language type, then your username and password before selectingStartup Repair in the System Recovery Options screen.)
With Startup Repair selected, Windows will attempt to automate the repair; this might work – otherwise, further action will be required.
Preparing Windows 7 Recovery
If the Startup Repair option fails, you will receive a message reading Windows cannot repair this computer automatically. At the bottom of the message, click View advanced options for system recovery and support to return to System Recovery Options, and instead clickCommand Prompt.
The black command line interface will open with X:\ selected by default; this is the Windows internal RAM disk that is used by System Repair. You will need to navigate to your Windows system drive, which will by default be on the C: drive.
To open this, type C: and press Enter. Type DIR and press Enter to check that you are in the right drive – the contents listed should include the Program Files, Users and Windows folders.
You will then need to change directory. Enter CD \windows\system32\config and then DIR to check that the correct files and folders are listed:
RegBack
DEFAULT
SAM
SECURITY
SOFTWARE
SYSTEM
With access to the correct directory and the required folders present, enter MD mybackup to create a backup folder. Enter copy *.* mybackup to copy everything to this location, agreeing to the overwrite warnings when they appear.
The RegBack folder stores automatic Windows registry backups. To check if these can be used in restoring your system, enter CD RegBack and then DIR to view the contents. In the folder, you should have the following:
DEFAULT, SAM and SECURITY files, each around 262,000 bytes
SOFTWARE file, around 26,000,000 bytes
SYSTEM file, around 9,900,000 bytes
Note that these figures are approximate, but recognise that if any of these files display a size of zero bytes then you will have to resort to another method of restoring Windows 7.
Running the Windows 7 Recovery
With your RegBack folder containing the data you need to restore Windows 7 and rescue it from the reboot loop, you will be able to copy the contents and use them to get the operating system back up and running again.
Begin by entering copy *.* .. – note the two trailing dots. These indicate that the contents should be pasted to the level above – the Config folder. Agree to all prompts concerning whether you want to overwrite files, and once the process has completed enter exit to close the command prompt.
On the System Recovery Options screen, click Restart to reboot your PC – if everything has gone as it should, Windows 7 should now start correctly!
Conclusion
Reboot loops have long been a problem with Windows. While previous versions offered a couple of ways out in the recovery options, these solutions were far from comprehensive.
The same is true in Windows 7 but there is at least a much better success rate of dealing with infinite reboot loops.
When following the steps outlined here, please take care to follow them precisely. Errors that you make while using the command line interface cannot be undone. Note also that these steps don’t guarantee success – you should be prepared to reinstall Windows in the event that fixing the reboot loop fails.
Windows 7 System Preparation Tool is a powerful, native Windows tool. When for instance used in so calledAudit Mode, it let's you to freely configure Windows 7 to be then deployed to other computers as hardware independent image.
In this tutorial we use System Preparation Tool (sysprep) to prepare your Windows 7 installation to be moved to a new computer, keeping all your installed applications, program settings and user profiles. You can use this method for instance when you have bought a new PC and want to transfer your existing setup completely, without need to reinstall everything, or when you want to make major hardware changes like change the motherboard or GPU, which would usually cause Windows to stop booting normally.
Warning
Using this method causes Windows 7 to lose all activation information, and it needs to be reactivated afterwards. If your Windows 7 is an OEM version, you might not be able to reactivate it, at least not without phone activation option.
I do not recommend to use this method on RAID systems. All experiments on RAID I know have failed.
With the speed of today's hardware evolution, most of us geeks are upgrading the hardware more often than operating system. Upgrading hardware can be painfully slow process if we need to reinstall the operating system and all our installed applications, plus transfer program settings and user profiles.
Using sysprep makes this easy. Changing the motherboard, or for instance an old ATI GPU to a new nVidia GPU quite often causes Windows 7 not to be able to boot anymore. This fact is usually accepted by the user, who then reinstalls the OS and all applications and transfers user profiles from a backup location.
Same thing when buying a new computer with completely different hardware setup compared to the old one, or trying to restore a system image to different hardware setup. Normally this would include a complete reinstallation of Windows 7 and all applications.
Why not use sysprep to avoid reinstalling? Here are the different scenarios where you can use it.
Warning
An upgraded Windows cannot be sysprepped. As this method is based in sysprepping, this tutorial is valid only for Windows setups which have not been upgraded.
This means that if you have for instance in-place upgraded Vista to Seven, or using Anytime Upgradeupgraded for instance a Home Premium to Ultimate, you cannot sysprep and this tutorial cannot be used in your case.
Notice that a repair install is also an upgrade install, so if you have ever done a repair install (= in-place upgrade to same edition), you cannot sysprep.
PLEASE DO NOT FORGET TO CREATE A SYSTEM IMAGE BEFORE PROCEEDING!
As you can read on this thread, on rare occasions this method does not work. If this happens, you can always restore your system using your backup image.
Changing hardware components but keeping old hard disk(s)
Use this method if you: - Change other hardware components but keep your old HD containing Windows 7
- Move the HD containing Windows 7 to another computer
Before installing new hardware, boot Windows 7 normally
Run Command Prompt as administrator .
.
Type to Command Prompt: %windir%\System32\Sysprep\Sysprep.exe, and hit Enter . .
In sysprep dialog that opens, choose System Cleanup Action as Enter System Out-of-Box-Experience (OOBE), selectGeneralize, select Shutdown OptionsShutdown. Click OK .
.
Sysprep generalizes now your Windows 7 setup and shuts down your computer. Do not run any other programs during this phase! .
.
.
Switch the main power of your PC off and install the new hardware OR dismount the hard disk(s) and mount it (them) to a new computer
Boot the PC from sysprep generalized hard disk. You will notice Windows booting as if it was the first boot after installation, installing default drivers and updating registry. One or two reboots are needed, depending on your system specifications .
.
.
.
When Windows finally boots up, you will need to enter all information as if this really was a new, fresh installation .
.
Because your old user profiles already exist, Windows does not accept your normal username, but instead you have to create a new temporary user. I use username Test for this purpose .
.
When login screen appears, choose your old user account to login .
.
Windows boots now to default OOBE first boot desktop, with default 800*600 resolution and default theme. All your installed applications are there, as well as your old user profiles and folders. Windows has installed the default drivers for your setup, you can update them if needed . .
Go to Control Panel > User Accounts and delete the temporary user account (in this case Test) that you just created
METHOD TWO
Change the hard disk(s) or move Windows 7 setup to a new computer using third party imaging software
Use this method if you: - Replace the HD containing Windows 7 on your old computer
- Move Windows 7 to a new HD on another computer
Follow steps 1 through 5 above (method 1)
Boot PC with an imaging CD/DVD (Paragon, Macrium etc.)
Create an image of your system
Turn PC off, change the hard disk(s) and reboot with imaging application, restoring the image OR boot the new computer with imaging software and restore the image
Continue from step 7 above (method 1)
METHOD THREE
Change the hard disk(s) or move Windows 7 setup to a new computer using Windows Seven's native Backup and Restore
Use this method if you: - Replace the HD containing Windows 7 on your old computer
- Move Windows 7 to a new HD on another computer
Follow steps 1 through 5 above (method 1)
Change the hardware componets you want to, letting the old HD be still mounted as system disk OR if transferring to a new computer, mount the old HD to the new computer as system (boot) disk
Boot computer normally, continuing from step 7 above (method 1)
Shut down the computer, dismount the HD and mount the new one
Boot from Windows 7 installation DVD, choosing Repair > Restore an image, using the image you created in previous step. This tutorial shows you how (from Step Two / 7): System Image Recovery
When image is restored, boot your computer normally
This procedure is failsafe, and works every time. There is nothing to worry, but of course it is recommended to make a backup before trying this. I have even used this method when some serious driver issues caused the PC to constantly crash (BSOD), to reset all drivers to Windows defaults and then reinstalling them one by one to find the culprit.
Note
What does Sysprep generalizing do to my Windows 7 setup?
All system specific information is removed or uninstalled
Security ID (SID) of your hardware setup is reseted
All system restore points are deleted
All event logs are deleted
All personalization is removed (taskbar, toolbars, folder options, start orb etc.)
Built-in administrator account is disabled (if it was enabled) and needs to be re-enabled if needed
What happens when booting first time after sysprep generalizing?
First boot configuration is run
New SID is created
Re-arm counter is reseted if not already re-armed three times
Windows 7 is booted using first boot default drivers and settings
I have tested all above mentioned methods with all versions of Windows 7, from Starter to Enterprise. It works every time, with one exception: for reasons unknown to me, sysprep seems sometimes dislike Windows Media Player networking service, which is by default started every time Windows 7 starts. In about every third time I've done this, I've got an error message when trying to generalize:
However, this is not a big problem. You just need to stop the WMP networking service, and run sysprep with generalize option again. You can stop the service in question by typing net stop WMPNetworkSvc to command prompt, and hitting Enter:
If you have any questions, do not hesitate to ask.
Happy computing!
Kari
EDIT: A Useful tip from xxxwea, as later confirmed by Victor:
Quote: Originally Posted by Victor S
Kari, just a suggestion.
You might note in the tutorial that if on first booting Windows can't finish configuring, a reboot into safe mode, then a normal reboot will allow it to finish successfully.
This has happened to me both times I used a sysprepped system drive in a new computer. I found the answer to this problemburied deep in this thread the first time I ran into it, and the same thing happened yesterday on a different computer.
It's a seemingly very silly solution, but it works. I do believe many people have abandoned their sysprep work when they encounter the problem.
Starting with Windows Vista and continuing into Windows 7. Is the ability to image a machine and to have the Windows installer use that image to install Windows. This negates the need for an image for each hardware configuration. Or the use of any third party software
This guide will show you how to create and image from scratch then prepare it for your domain using sysprep. Then how to install Windows 7 from this image.
Install Windows 7 from scratch on to your test machine. DO NOT upgrade from Windows XP, this needs to be a fresh install.
Customise Windows 7 with any software, security settings or general settings you wish. When you install from this image all the settings as well as user accounts will be installed by default.
Install WAIK for 7/2008 on the test PC. Download from here (1.7GB).
Create WINPE Disk
Right click command prompt run as admin
Change to directory “C:\Program Files\Windows AIK\Tools\PETools”
run command “copype x86 c:\winpe”
run command “imagex /mountrw c:\winpe\winpe.wim 1 c:\winpe\mount”
copy imagex.exe from “C:\Program Files\Windows AIK\Tools\x86\imagex.exe” to “c:\winpe\mount\windows\system32″
Create wimscript.ini in “c:\winpe\mount\windows\system32″ with following inside
[ExclusionList]
ntfs.log
hiberfil.sys
pagefile.sys
"System Volume Information"
RECYCLER
Windows\CSC
[CompressionExclusionList]
*.mp3
*.zip
*.cab
\WINDOWS\inf\*.pnf
Run Command “imagex.exe /unmount /commit c:\winpe\mount”
Run Command “copy c:\winpe\winpe.wim c:\winpe\iso\sources\boot.wim /y”
Run Command “oscdimg -n -h -bc:\winpe\etfsboot.com c:\winpe\iso c:\winpe\winpe.iso”
This will create an ISO in c:\winpe\winpe.iso. Burn this and keep. Now we need to sysprep our machine. (You can remove WAIK and any files you don’t need, test your iso first!)
Sysprep Your Machine
change to the folder “c:\windows\system32\sysprep\”
run command “sysprep /generalize /oobe /shutdown”
If you want to use run an unattended installation you can run the following command sysprep /generalize /oobe /shutdown /unattend:unattend.xml (The unattend.xml will need to be in the sysprep folder). Check out the unattend.xml generator
Sysprep will remove any unique information and reseal the OS. Then the system will shutdown
Now boot the ISO we created previously and load into WinPE
Capture Image
Once WinPE is booted you will be in a Command Prompt window
Run Command “diskpart”
Run Command “select disk 0″
Run Command “list volume”
Note the letter of the drive you are imaging. C:\ in WinPE is set as the running OS not as the internal HDD
Run Command “exit”
Run Command “imagex /capture d:\ d:\install.wim “My Windows partition”" where d:\ is the drive you are copying
This will create a file called install.wim in the root of your HDD. This is the custom image and will need to be added to the Windows 7 Install DVD
Create Installation Media
You will probably need to install from USB as the image will probably be to large for a DVD. Here is a guide for Windows 7 USB Install
overwrite install.wim to \sources on the windows 7 install source
If you didn’t use the sysprep to include unattend.xml you can also add it directly to the root of the install media. You can easily Generate an unattend.xml here
Install Windows 7 as normal. Your changes will be installed along with Windows 7
How to enable TRIM Command in Windows 7 with a Solid State Drive
To enable or disable TRIM Command, you will need to open an Elevated Command Prompt window.
How To Open an Elevated Command Prompt window: Click on Start Orb > Type "CMD.exe" in Search box > Right click on "CMD" and select "Run as Administrator" (If you receive a prompt confirmation, click YES)
How to Enable TRIM Command
In the Elevated command Prompt windows, type the following:
fsutil behavior set disabledeletenotify 0
How to Disable TRIM Command
In the Elevated command Prompt windows, type the following:
fsutil behavior set disabledeletenotify 1
How do I know if TRIM is working in Windows 7?
In the Elevated command Prompt windows, type the following:
fsutil behavior query disabledeletenotify Results explained below: DisableDeleteNotify = 1 (Windows TRIM commands are disabled) DisableDeleteNotify = 0 (Windows TRIM commands are enabled)
How to enable AHCI in Windows 7 after Instalation:
There is one way to fix this, although you need to have knowledge of registry editing. The detailed steps from Microsoft are as follows:
1.Exit all Windows-based programs. 2.Click Start, type regedit in the Start Search box, and then press ENTER. 3.If you receive the User Account Control dialog box, click Continue. 4.Locate and then click the following registry subkey: HKEY_LOCAL_MACHINESystemCurrentControlSetServicesMsahci 5.In the right pane, right-click Start in the Name column, and then click Modify. 6.In the Value data box, type 0, and then click OK. 7.On the File menu, click Exit to close Registry Editor.
After this you’ll have to restart your computer, go to BIOS and enable AHCI. When you log in to Windows again, you’ll notice the installation of drivers for AHCI. Another restart will be required to finish the driver installation.
These steps are provided at your own risk and not suggested unless you know and understand the risks. You will want to make sure the controller driver and MB BIOS support this option before you enable it
This will show you how to restore your Windows 7 hard disk back to exactly how it was when you created asystem image backup.
Warning
You can only do a system image recovery to a HDD that is the same size or larger than the one the system image was created from. You will not be able to do a system image recovery to a smaller HDD.
When you restore your computer from a image backup, it is a complete restoration. You can't choose individual items to restore, and all of your current programs, system settings, and files are replaced.
If your backup image is on a external device (ex: USB drive), then make sure it is connected before starting. If USB drive, then also make sure that you have your BIOS settings (ex: Legacy USB) set to allow USB devices at boot.
A system image recovery will format everything on each hard drive that was included in a system image, and will only restore what is included (see steps 7-9 in STEP TWO below) in the system image back. Be sure to backup anything that you do not want to lose that is not included in the system image backup first.
STEP ONE
Only if You Renamed the "WindowsImageBackup" Folder
Note
To be able to have multiple versions of system images saved on the same drive or partition, you would need to rename the older WindowsImageBackup folder from the previously created system image as described in the NOTE box at the top of this tutorial.
If you renamed the WindowsImageBackup folder for the system image version that you wanted to restore, then you will need to do the steps below before you will be able to restore that system image.
1. If you are "Able to Boot" into Windows 7
A) In Windows Explorer, navigate to the renamed (drive letter)\WindowsImageBackup folder location of the system image that you want to restore.
B) If you already have a folder named WindowsImageBackup that is not the system image version that you want to restore, then you will need to right click on it, click on Rename, and type in say WindowsImageBackup-Copy-2 as an example.
C) Now, right click on the renamed system image version (ex: WindowsImageBackup-Copy-1) that you did want to restore, click on Rename, type in WindowsImageBackup an press enter.
D) Go to the STEP TWO section below to do the System Image Recovery.
2. If you are "Not Able to Boot" into Windows 7
A) If you have the system image backup save to an external device, be sure that it is connected now.
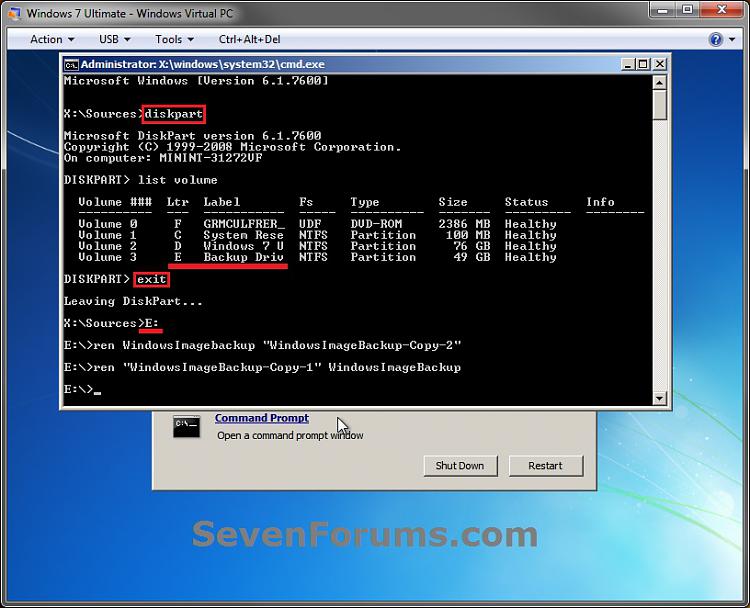
C) In the command prompt, type diskpart and press enter. (see screenshot below)
D) In the command prompt, type list volume and press enter. (see screenshot below)
E) Make note of the drive letter (ex: E: ) that you have the system image backup saved to.
F) In the command prompt, type exit and press enter. (see screenshot below)
G) In the command prompt, type the E: and press enter. (see screenshot below) NOTE:Subsititute E: for your actual drive letter at step 2E instead.
H) If you already have a folder named "WindowsImageBackup"
NOTE:This is if you already have a folder named WindowsImageBackup that is not the system image version that you want to restore. If so, you would need to rename it to say WindowsImageBackup-Copy-2 as an example.
In the command prompt, type the command below and press enter. (see screenshot below) NOTE:Substitute WindowsImageBackup-Copy-2in the command below with any name in quotes that you would like to rename it to instead.
I) In the command prompt, type the command below and press enter. (see screenshot below) NOTE:Substitute WindowsImageBackup-Copy-1 in the command below with the actual name of your renamed system image folder in quotes that you want to use to restore instead.
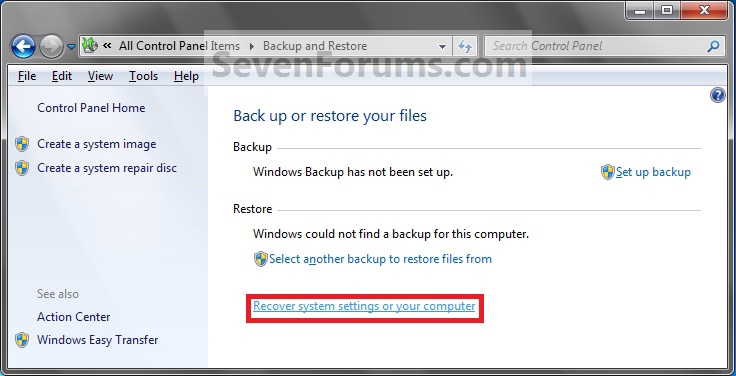
B) Click on the Recover system settings on your computer link. (see screenshot below)
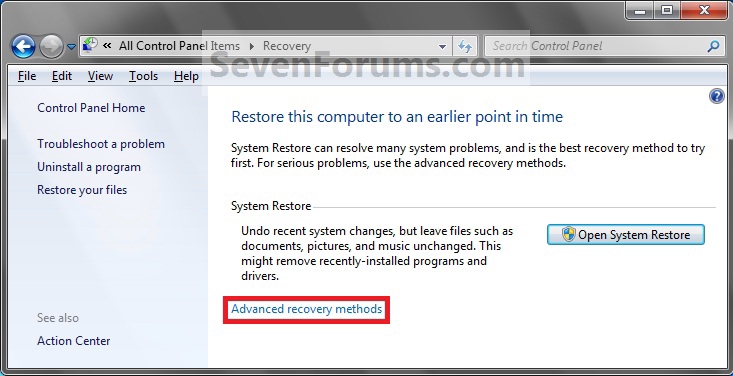
C) Click on the Advanced recovery methods link. (see screenshot below)
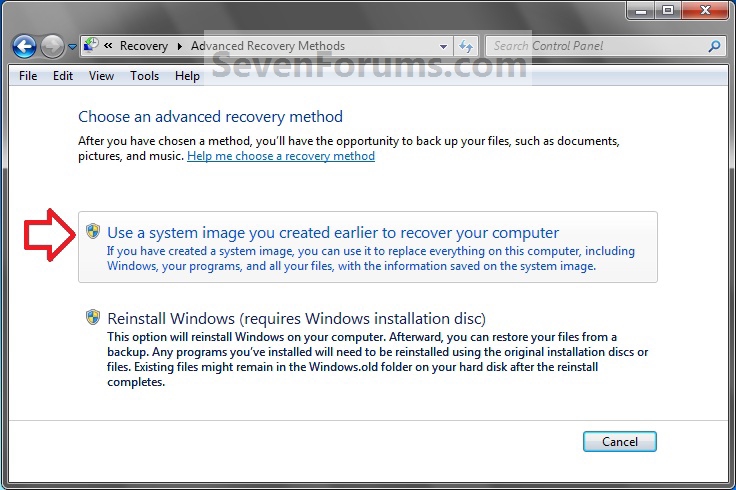
D) Select the Use a system image you created earlier to recover your computer option. (see screenshot below)
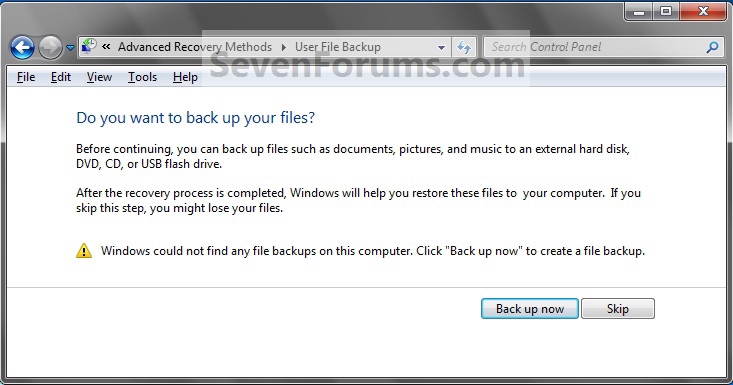
E) Select to either create a Back up now, or to Skip it and continue the system image recovery without backing up any of your current files. NOTE:If you select Back up now, it will take you to step 6 in this tutorial link to create a User and System File back up of your current files first before continuing to step 1F. (see screenshot below)
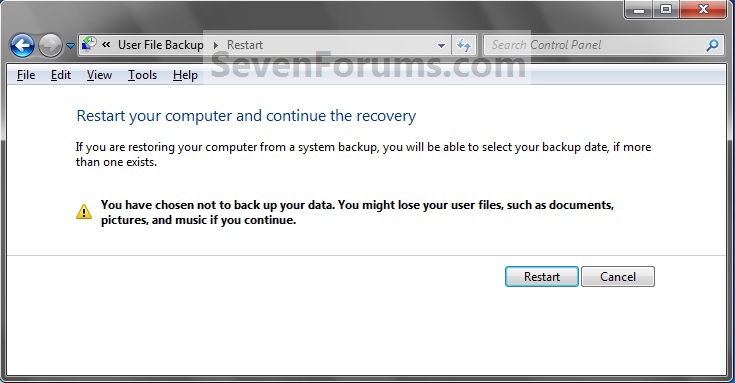
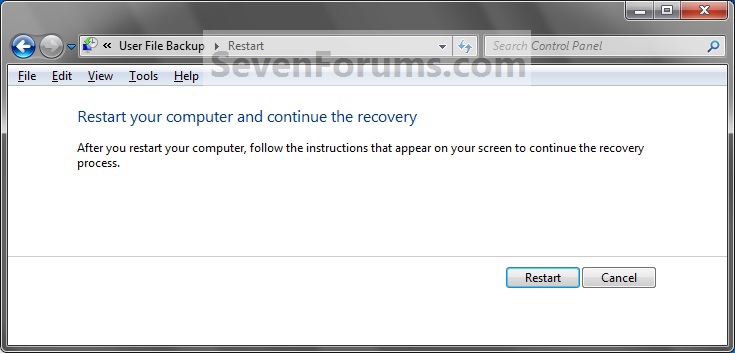
F) Click on Restart. (see screenshot below)
G) Select a languange to be used for your keyboard input and click on Next. (see screenshot below)
H) Go to step 4.
3. From the System Recovery Options Screen at Boot
B) Select the System Image Recovery option. (see screenshot below)
4. If you saved the system image backup to a set of DVDs, then insert the last DVD from the set when prompted. If not, go tostep 5 for a system image backup on a hard drive.
A) Go to step 7 below.
5.To Use the Latest System Image
A) Select (dot) Use the latest available system image and click on Next. (see screenshot below)
B) Go to step 7.
6.To Select a System Image
A) Select (dot) Select a system image, and click on Next. (see screenshot above) NOTE:This is if the system image that you want to use is not listed here and is at another location that you wish to choose from instead.
B) Select the location of the backup image for the computer you want to restore from the list, and click on Next. (see screenshot below)
Note
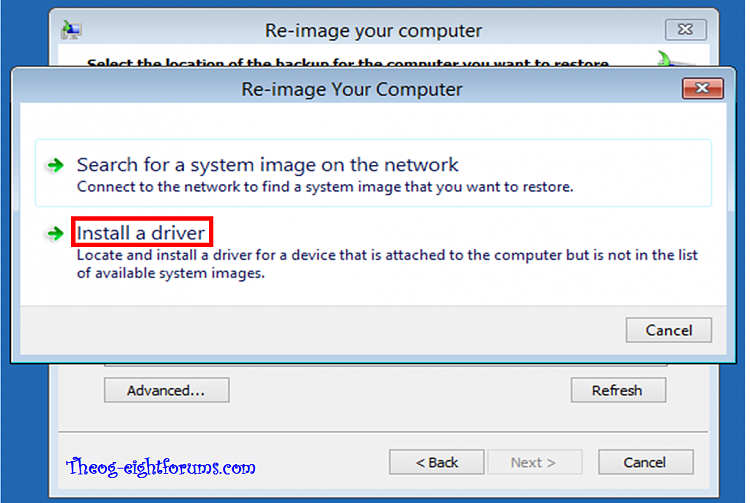
To add a image from a network location, click on the Advanced button, and on the Search for a system image on the network option.
If the drive cannot be seen to select a system image from, then you may need to use the tutorial below to load your SATA or RAID drivers before it will be seen. You would click on the Advanced button, and on theInstall a driveroption.
C) Select the date and time of the system image to restore, and click on Next. (see screenshot below)
7. To Do a Full System Image Recovery NOTE:This option will format everything on each hard disk drive that was included in the system image, then restore them as they were when the system image was created.
Note
Format and repartition disks box: NOTE:Special thanks to MJF for this addition.
1) Grayed out and selected You are forced to have the whole disk formatted and repartitioned to match the partition structure of the disk the image was made from. This can occur when restoring an image to a new disk or the original disk with a modified partition structure. Data on other partitions on the disk you are restoring to will be lost.
2) Grayed out and unselected You are not given the option to format and repartition the disk. This will occur if you are restoring Windows from a partition on the same disk.
3) Not grayed out and unselected Here you have the option to select format the whole disk and repartition or not. In this case the disk the image was taken from has a matching partition structure to the disk you are restoring the image to. By not selecting the format and repartition option your image will be restored and other partitions untouched such as valuable data partitions.
A) Check the Format and repartition disks box (if not grayed out)and uncheck Only restore system drives box(if available), and click on Next. (see screenshots below)
B) Go to step 10.
8. To Only Restore System Drives in System Image Recovery NOTE:When restoring to the same disk containing data partitions, the Format and repartition disksoption may format the data partitions as well. If this is the case and you have the option to leave the Format and repartition disksbox unchecked, then initially attempt your image recovery with the Format and repartition disksbox unchecked. If recovery is unsuccessful, repeat the process with the format box ticked.
A) If available, check the Only restore system drives box, and click on Next. (see screenshot below)
B) Go to step 10.
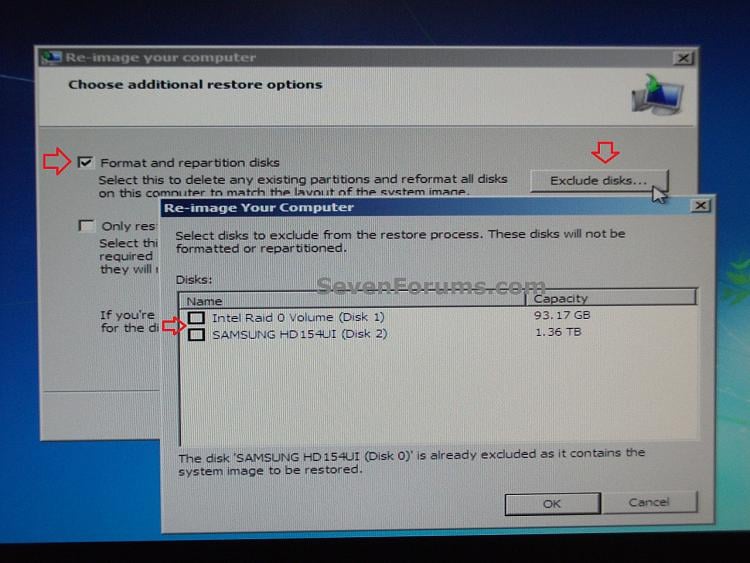
9.To Exclude Restoring Specific Drives in System Image Recovery NOTE:Since a system image recovery will format everything on each hard disk drive that was included in a system image, this will allow you to exclude specific disks so that specific disk will not be formated or restored.
A) Check the Format and repartition disks box , and click on the Exclude disks button (if not grayed out). (see screenshot below) NOTE:If the Exclude disks button is grayed out, then the HDD that you are restoring to is empty, or you do not have any disks in the system image that are able to be excluded from being restored.
B) Unselect the drives that you want to exclude from being restored.
C) Click on Next.
10. Click on Finish. (see screenshot below)
11. Click on Yes. (See screenshot below)
12. You will now see this screenshot below. NOTE:If you have the backup image on DVDs, have them ready. See step 4 above.13. When it is through, click on Restart Now to finish. (see screenshot below) NOTE:Your computer will restart and the backup image restoration will be done.14. If you created a backup in step 1E, then you will now see this option to Restore my files after the computer restarts. (see screenshot below)