Login

Source: 

1. The no registry approach.


Simply boot to the login screen or the Lock screen and do the following:

  1. On the Logon/Lock screen, press the NumLock key on the keyboard to turn it on.
  2. The Login screen contains a power button in the bottom right corner. Use it to reboot Windows:

The next time Windows boots, NumLock will be automatically enabled. If this trick does not work for you for some reason, try the Registry tweak below. It should work in all modern Windows versions including Windows 10 and Windows 8.x.

2. The registry approach.

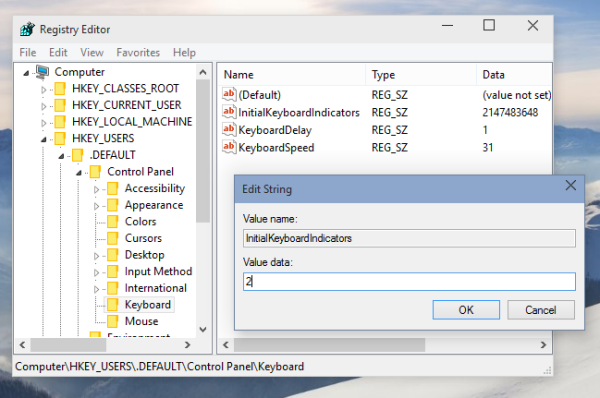
  1. Open Registry Editor.
  2. Go to the following Registry key:
    HKEY_USERS\.DEFAULT\Control Panel\Keyboard

    Tip: You can access any desired Registry key with one click.
    If you do not have this Registry key, then just create it.

  3. Find the string value called "InitialKeyboardIndicators". In Windows 7, set its value data to 2. In Windows 8 and above, set its value to 80000002. A note for Windows 10 users: if your Windows 10 does not save the state of NumLock after the reboot, try to set the value "InitialKeyboardIndicators" to 2147483650. This will turn on NumLock on the logon screen starting from the next boot.enable numlock Windows 10

Bonus tip:Using the InitialKeyboardIndicators parameter, it is possible to control other keys besides NumLock. See the table for its possible values for Windows 7:

InitialKeyboardIndicators value Purpose
0 Turn all indicators off (NumLock, CapsLock, ScrollLock)
1 Turn CapsLock on
2 Turn NumLock on
3 Turn CapsLock and NumLock on
4 Turn ScrollLock on
5 Turn CapsLock and ScrollLock on
6 Turn NumLock and ScrollLock on
7 Turn all indicators on (NumLock, CapsLock, ScrollLock)

For Windows 8 and above you should try to use values like 80000000,80000001,80000002, i.e. add 80000000 to Windows 7 value.

Source: 

Introduction

Installation of a new motherboard can be a real pain in the butt. If your new motherboard uses any other chipset then the old one, chances are you may experience the BSOD (blue screen of death) in Windows 2000/XP. Back when we were all running Windows 95/98, we could reset the hardware configuration. In my opinion if Microsoft decided to add this very useful feature to Windows 2000/XP, it could solve a lot of issues and save us all lot's of trouble. 

This article will show you how to avoid the blue screen of death after you install a new motherboard with a different chipset. I found out about it few years ago when I worked as a Network administrator. Windows 2000 installation takes a long time and we couldn't use Norton Ghost due the motherboard chipset differences between the huge amounts of computers in the building.

How does it work? It's actually not really difficult. Windows 2000/XP supports ACPI and the old legacy way of allocating resources. Back in the day we had to configure devices manually and then with the release of Windows 95, PnP (Plug and Play) was introduced to do this job for us. Windows 2000/XP supports both and it uses different hardware table records. All you have to do is to Switch from ACPI to the old legacy way and it will rest the hardware table record and detect your new motherboard without any blue screens. Don't worry your system won't stay the old legacy way. 

Before I start please be advised it may not work perfectly on some systems and I'm not responsible for any damage or data lose. USE THIS GUIDE AT OWN RISK!!

What you need?
* Administrator account with Administrator password
* The new Motherboard with Non-ACPI Operation System support (most of the motherboards support this) 
* A printed copy of this guide 

Stage I - Backup
The best way to start is to do a complete backup of your current Hard-Disk/Partition just in case you encounter any difficulties. I would typically use Symantecs Ghost for this task. Those who choose to skip this part; remember not to blame me for any lost data. I warned you!

Stage II - Driver cleanup
Remove and uninstall all your currently installed drivers. Video Cards, Sound Cards, Chipset, IDE. Make sure to remove them all through Control Panel > Add and Remove. After you are sure you have removed all of your drivers its time to reboot.

Stage III - Disabling ACPI
Enter The Device Manager by clicking on Start Menu then Run, then type devmgmt.msc and press Enter. Expand the "Computer" value and double click the "ACPI Uniprocessor PC". Click on the driver tab and click "Update Driver..." A new window will pop up. Choose to "Install from a list or specific location (Advanced)" and click on "Don't Search. I will choose the driver to install". Uncheck the box "Show compatible hardware". Select "Standard PC" and click next, then click OK. A restart prompt will show up and click "No". DO NOT RESTART!!! Just shut down your system and do not turn it on until you replace your motherboard in the next stage.


Stage IV - Replacing the motherboard
After you shut down the system you have to replace the old motherboard with the new one. So do it now. After you are done, turn the system on and continue to load windows normally. Windows will load up and redetect the entire hardware configuration. Let windows install the new drivers and reboot as many time as it necessary but wait… It's not over yet!

Stage VI - Cleaning up the old drivers
Click on Start menu and then on Run and type "cmd.exe" and press enter. A windows command prompt will show up. Type: set devmgr_show_nonpresent_devices=1 and press enter. Now type devmgmt.msc and click enter. Device Manager will open. Inside Device Manager click on the "View" tab and then click on "Show hidden devices". Device Manager will now show the old devices/drivers. Old device will have transparent icon like in the following screenshot. Remove all of these Old devices but Do Not touch the Old devices inside the "Non-Plug and Play Drivers" and in the "Sound, video and game controllers" tabs.


It should look like the screenshot above


Stage VII - Reinstalling ACPI
Return to Device Manager by clicking on Start Menu then Run, then typing devmgmt.msc and press Enter. Expand the "Computer" value, You will notice there are two Standard PCs. double click the First Standard PC (from the top). Click on the driver tab and click "Update Driver..." A new window will pop up. Choose to "Install from a list or specific location (Advanced)" and click on "Don't Search. I will choose the driver to install". Uncheck the box "Show compatible hardware". Select "Advanced Configuration and Power Interface (ACPI) PC" and click next, then click OK and Restart.


Windows will now detect the devices again. When its done restart the system again.
Now after the system has been restarted return to Device Manager by clicking on Start Menu then Run, then typedevmgmt.msc and press Enter. Expand the "Computer" value and right click "Standard PC" and choose "Uninstall" and reboot. 

Stage VIII - The End
Cleanup the old devices again (follow Stage VI again). Install all your drivers again. Congratulations you are done!

When you try to install updates from the Windows Update site or from Microsoft Update Web site, you may receive the following error code:

0x80246007 or 0X80248007
 
Try this solution for 0x80246007
Try this solution for 0X80248007


0x80246007

This problem may occur if the Windows Update database is corrupted.

To resolve this problem in Microsoft Windows 2000, Windows XP, and Windows Server 2003

Important If you have downloaded but not installed updates from Windows Update or from Microsoft Update, you must download those updates again after you complete these steps.

Read more: 0x80246007 or 0X80248007 Windows Update errors

Source: 

UEFI and Windows

June 13, 2012

Abstract

This white paper provides an overview of PC software and an overview of Unified Extensible Firmware Interface (UEFI) technology. It highlights the capabilities that UEFI offers, and it describes differences between UEFI and BIOS firmware. It also describes support for UEFI in Windows® operating systems.

This information applies to the following operating systems:


        Windows 8
        Windows 7
        Windows Vista with Service Pack 1 (SP1)
        Windows Server 2012
        Windows Server 2008 R2
        Windows Server 2008
        Windows Server 2003


The current version of this paper is maintained on the web at http://www.microsoft.com/whdc/system/platform/firmware/UEFI_Windows.mspx.


Disclaimer: This is a preliminary document and may be changed substantially prior to final commercial release of the software described herein.


The information contained in this document represents the current view of Microsoft Corporation on the issues discussed as of the date of publication. Because Microsoft must respond to changing market conditions, it should not be interpreted to be a commitment on the part of Microsoft, and Microsoft cannot guarantee the accuracy of any information presented after the date of publication.


This White Paper is for informational purposes only. MICROSOFT MAKES NO WARRANTIES, EXPRESS, IMPLIED OR STATUTORY, AS TO THE INFORMATION IN THIS DOCUMENT.


Complying with all applicable copyright laws is the responsibility of the user. Without limiting the rights under copyright, no part of this document may be reproduced, stored in or introduced into a retrieval system, or transmitted in any form or by any means (electronic, mechanical, photocopying, recording, or otherwise), or for any purpose, without the express written permission of Microsoft Corporation.


Microsoft may have patents, patent applications, trademarks, copyrights, or other intellectual property rights covering subject matter in this document. Except as expressly provided in any written license agreement from Microsoft, the furnishing of this document does not give you any license to these patents, trademarks, copyrights, or other intellectual property.


Unless otherwise noted, the example companies, organizations, products, domain names, e-mail addresses, logos, people, places and events depicted herein are fictitious, and no association with any real company, organization, product, domain name, email address, logo, person, place or event is intended or should be inferred.


© 2006–2012 Microsoft Corporation. All rights reserved.


Microsoft, Windows, Windows Server, and Windows Vista are either registered trademarks or trademarks of Microsoft Corporation in the United States and/or other countries.


The names of actual companies and products mentioned herein may be the trademarks of their respective owners.

Document History

Date

Change


April 20, 2006

First publication with title of “EFI and Windows Vista”

July 25, 2008

Updated for Windows Server 2008 and Windows Vista SP1

September 14, 2009

Added more detail to UEFI features and Windows 7 support

September 27, 2011

Added more detail to UEFI features and Windows 7 support

October, 2011

Updated for Windows 8 and Windows Server 2012

June 13, 2012

Additional updates for Windows 8 and Windows Server 2012


Contents

Introduction. 4

Types of PC Software. 4

Firmware. 4

BIOS. 5

UEFI5

Operating system software. 5

Application software. 5

UEFI Advantages. 6

Compatibility with earlier BIOS. 6

Support for large disks. 6

CPU-independent architecture. 6

CPU-independent drivers. 6

Flexible pre-OS environment. 7

Modular design. 7

Windows Support for UEFI7

Current Windows-specific UEFI highlights. 8

Multicast deployment. 8

Fast boot and resume from hibernation. 8

Future UEFI capabilities. 8

Rootkit prevention. 8

Network authentication. 9

Summary. 9

Resources. 9


Introduction

The Unified Extensible Firmware Interface (UEFI) specification is the product of an industry-wide effort to improve software interoperability and address the limitations of earlier firmware designs.

This paper introduces firmware concepts in general and UEFI in particular for business planners, system builders, and anyone who's curious about UEFI technology. The "Resources" section at the end of this paper provides links to related information, including technical details about UEFI implementation.

Types of PC Software

The software that runs on a PC can be classified into vertically integrated components, as shown here:

Firmware

Every PC is preloaded with firmware. Firmware is the hardware-specific code that directs the hardware's response to commands from higher-level software. Firmware is typically embedded in nonvolatile storage that's directly attached to a hardware device, like a motherboard. Specifically, firmware is typically stored in programmable read-only memory (PROM), electrically erasable programmable read-only memory (EEPROM), or flash memory. But firmware also resides on optional device hardware like video cards and storage controllers.

Firmware provides the first set of instructions that run during the boot process. After the firmware finishes detecting hardware and initializing the system, it passes control to a boot application like the boot loader in an operating system or a tool that runs before the operating system is loaded (sometimes called a pre-OS tool).

BIOS and UEFI are examples of firmware. PCs typically use one or the other.

BIOS

BIOS firmware was developed for the earliest PCs in the 1970s. Although BIOS is still the most prevalent firmware type, BIOS is increasingly limited because it supports only 16-bit processor mode and 1 megabyte (MB) of addressable memory space. Adding support for new hardware on BIOS systems is also relatively complex because no universal BIOS standard exists and BIOS implementations can vary from one vendor to the next.

UEFI

As the limitations of BIOS firmware became more apparent, the PC industry recognized the need for a more flexible standard. The first Extensible Firmware Interface (EFI) specification was completed in the late 1990s. In 2005, the Unified EFI Forum was formed to standardize and promote UEFI implementations. More than 140 leading technology companies currently participate in the Unified EFI Forum, including AMD, AMI, Apple, Dell, HP, IBM, Insyde, Intel, Lenovo, Microsoft, and Phoenix Technologies.

In contrast to BIOS, UEFI defines a set of boot and runtime services that have standard syntax and semantics for interfaces and data structures. This means that all UEFI implementations behave essentially the same way, making it possible to test and develop standard drivers and applications. This greatly improves interoperability, reduces the complexity of supporting new hardware, and helps computer manufacturers update and maintain firmware more rapidly.

Operating system software

An operating system acts as an interface between hardware and higher-level software. The Windows® operating system coordinates background activity and manages shared hardware and software resources among multiple applications.

The primary Windows boot application is the boot manager (Bootmgr). The boot manager uses services that the PC firmware provides to access key hardware resources like storage devices, graphics devices, and system memory. It can then start to load the rest of the operating system.

During the first stages of the boot process, all operating systems use services that the firmware makes available to access hardware and load other operating system components. Initially, Windows uses firmware services to load early system components. But after device drivers are loaded, Windows no longer interacts directly with platform firmware services for hardware access. The system then relies primarily on high-performance device drivers instead of firmware services.

Windows limits the use of firmware services as much as possible to help ensure system reliability. Although most interaction with the firmware occurs during the boot process, Windows can also interact with firmware at run time.

Application software

After the operating system has prepared a suitable environment, application software uses a standard set of system-supplied interfaces to perform tasks that are more specific and that are separate from the details of system management. Users can install and remove applications without modifying the core operating system or system firmware.

UEFI Advantages

In addition to better interoperability, UEFI firmware provides the following advantages.

Compatibility with earlier BIOS

Most current UEFI implementations include a Compatibility Support Module (CSM) that emulates earlier BIOS. So, systems with UEFI firmware can boot operating systems that are UEFI aware and older operating systems that support only BIOS. This feature provides flexibility and compatibility for end users.

Support for large disks

BIOS systems support disks that use the master boot record (MBR) partitioning scheme. This scheme is limited to a maximum disk size of roughly 2.2 terabytes and a maximum of 4 primary partitions.

UEFI supports a more flexible partitioning scheme called GUID Partition Table (GPT). GPT disks use 64-bit values to describe partitions. This scheme allows a maximum disk size of roughly 16.8 million terabytes and 128 primary partitions.

CPU-independent architecture

Although BIOS can run 32-bit and 64-bit operating systems, during early stages of boot, it relies on a 16-bit interface called "real mode". This interface is based on the original Intel x86 processor architecture. All firmware device drivers (such as RAID controllers) on BIOS systems must also be 16-bit. This requirement limits the addressable memory to 64 kilobytes (KB) in the early stages of boot and consequently constrains performance.

UEFI isn't specific to any processor architecture. It can support modern 32-bit and 64-bit firmware device drivers. The 64-bit capability enables the system to address more than 17.2 billion gigabytes (GB) of memory from the earliest stages of boot.

CPU-independent drivers

On BIOS systems, Peripheral Component Interconnect (PCI) add-on cards must include a large ROM that contains a separate driver for all supported CPU architectures. Or the card vendor must provide a unique stock-keeping unit (SKU) for each processor architecture.

All UEFI implementations that conform to the UEFI specification include an EFI Byte Code (EBC) interpreter. EBC images are drivers that are compatible across all processor architectures. This enables device-driver and application developers to create a single EBC image that can run on any system. Because EBC images are highly compact and universally applicable, firmware drivers (also known as option ROMs) in a PCI card can be much smaller than they are on BIOS systems, and they can serve multiple markets. This helps reduce cost and confusion and makes it much easier for system vendors to update or replace drivers as necessary.

Flexible pre-OS environment

UEFI drivers and applications run in the boot environment with very few constraints. For example, UEFI can provide a full network protocol stack in addition to high-resolution graphics and access to all devices, even if no functional operating system is available.

Because UEFI supports a flexible pre-OS programming environment, UEFI applications can perform a wide variety of tasks for any type of PC hardware. For example, UEFI applications can perform diagnostics and firmware upgrades, repair the operating system and notify technicians, or contact a remote server for authentication.

Modular design

BIOS implementations must be carefully customized for a specific set of hardware. The tightly interwoven components often mean that even small changes can have wide-ranging effects. The introduction of new hardware and protocols typically requires significant portions of BIOS firmware to be rewritten. This is expensive and time-consuming.

UEFI defines modular components and generic interfaces that intentionally abstract the details of the hardware/software interface. This approach enables firmware vendors to introduce new hardware and protocols, fix bugs, or alter the behavior of specific components with minimal effects on the rest of the system.

Windows Support for UEFI

Windows support for UEFI began in 2002. Since then, support for UEFI has become standard in these 64-bit editions of Windows:

  • Windows client operating systems:
  • Windows Vista® with Service Pack 1 (SP1) and Windows 7 support UEFI 2.0 or later on 64-bit systems.
  • Windows Server® operating systems:
  • Windows Server 2003 supports EFI 1.10 on Itanium-based systems.
  • Windows Server 2008 and Windows Server 2008 R2 support EFI 1.10 on Itanium-based systems. They support native UEFI 2.0 or later on 64-bit systems.


Note: The 32-bit editions of Windows don't support UEFI features. Only 64-bit editions of Windows can take advantage of the features that 64-bit UEFI firmware enables. Fortunately, the CSM in current UEFI implementations enables 32-bit operating systems and other operating systems that don't support UEFI to boot on hardware that has UEFI firmware. But, operating systems that require a CSM to boot can't use UEFI-specific features because the CSM emulates earlier BIOS.

Because of the widespread availability of 64-bit hardware, the capabilities that UEFI offers, and the rapid transition to UEFI firmware, Microsoft has chosen to implement all new firmware-related Windows features on UEFI systems first. Microsoft will evaluate the possibility of additional architectural work to support new features on older BIOS systems on a case-by-case basis.

Current Windows-specific UEFI highlights

Two of the most notable Windows features for UEFI systems are multicast deployment and fast boot and resume times.

Multicast deployment

Most large organizations and system builders use image-based deployment to install an operating system that is preconfigured to meet their specific requirements. The Original Equipment Manufacturer (OEM) or other large organization first creates a customized system image that includes the appropriate applications and settings. When new computers are added or older ones require operating system reinstallation, the image is sent over the network to the destination computers.

Traditional methods of unicast image deployment require each system to set up an individual connection with a central server and then download the full image over the network before installation can proceed. Unicast deployments often consume considerable network bandwidth and frequently overwhelm central image servers when too many connections happen at the same time.

Windows-based systems that support UEFI can perform multicast image deployment. During a multicast deployment, a central image server can send an image to multiple client computers at the same time. Any client that joins while the multicast deployment is underway can receive the latter portion of the image, and then wait for the server to start another multicast deployment to fill in the first portion. This approach is especially useful in a manufacturing environment, because many clients can simultaneously receive images without overwhelming the network or the image server.

Fast boot and resume from hibernation

Windows-based systems can boot and resume activity faster by reading data more efficiently.

UEFI systems use EFI block I/O protocols, which read data 1 MB at a time. Earlier BIOS systems use a firmware interface called Interrupt 13h (Int13), which reads data at only 64 KB at a time.

Fast boot and resume times improve the user experience.

Future UEFI capabilities

The UEFI interface provides ample room for innovation in the development of operating system features. Along with the other members of the Unified EFI Forum, Microsoft is investigating rootkit prevention and network authentication.

Rootkit prevention

By running early in the boot process, rootkits can perform malicious actions and then hide their presence from operating system and security software that runs later. This is why rootkits are so dangerous.

UEFI firmware today supports Authenticode digital signatures in the pre-OS environment. By using this capability, the firmware can verify software before it runs and make sure that no untrusted code runs before the operating system is loaded. This enables the operating system to establish a security foundation for all the other software on the computer. Microsoft supports this capability and encourages hardware partners to take advantage of it.

Network authentication

As part of its pre-OS driver and application support, UEFI can provide network connectivity and authentication in the earliest stages of the boot process. These features might assist in performing network-based image deployment that helps safeguard security. In such a scenario, clients can trust the server that they download an image from, and the server detects that the clients are legitimate corporate assets that should receive the images. This capability might be used in a future version of Windows or together with other Microsoft deployment technologies.

Summary

Although the current advantages of UEFI—like flexibility and reduced update and development costs—seem to apply most directly to OEMs and software developers, PC consumers also benefit. Cheaper, more reliable UEFI systems that have a wider variety of capabilities enable new, innovative solutions to difficult problems.

Along with more than 140 other companies in the Unified EFI Forum, Microsoft supports the standardization and interoperability that UEFI provides and welcomes the industry-wide transition to UEFI firmware.

Resources

UEFI Support and Requirements for Windows Operating Systems

http://www.microsoft.com/whdc/system/platform/firmware/uefireg.mspx

Advanced Configuration and Power Interface (ACPI) Specification

http://www.acpi.info/spec.htm

Unified Extensible Firmware Interface Specifications

http://www.uefi.org/specs/

EFI Specification 1.10 (included here for historical purposes)

http://www.intel.com/technology/efi/main_specification.htm

Unified EFI Forum

http://www.uefi.org/home/
It happened to me a couple of times to start a customer's PC (fortunately not my own ones) only to see that some updates are pending. Before reaching 100% you get a failure message and a restart. After the restart the machine boots normally to windows after reverting changes. But on your next restart you will see the same issues again, reaching 100%, failure, boot normally and Groundhog Day all over again. I found these 2 solutions that worked for me.

1. Within the Windows environment do the following:
- Press Windows Logo+R to bring up the Run dialog
- Copy and Paste the command "dism.exe /image:C:\ /online /cleanup-image /revertpendingactions"
- You should briefly see the Command Prompt window. Do a restart and check if the pending updates are still there.
- Run a full Windows Update once again.

2. You can remove the file "C:\windows\winsxs\pending.xml". If Windows doesn't allow you to do it for security or privilege reasons then you'll have to do it through the recovery console or take the HDD to another PC with running OS and delete it.
After rebooting into the system, run a full Windows Update once again.


*** I've tried it on Windows 7 (Pro and Ultimate) and I see that Microsoft's Technet website has listed this command as compatible with Windows 8 and 8.1.

Source: 

Windows system key combinations

  • F1: Help
  • CTRL+ESC: Open Start menu
  • ALT+TAB: Switch between open programs
  • ALT+F4: Quit program
  • SHIFT+DELETE: Delete item permanently
  • Windows Logo+L: Lock the computer (without using CTRL+ALT+DELETE)

Windows program key combinations

  • CTRL+C: Copy
  • CTRL+X: Cut
  • CTRL+V: Paste
  • CTRL+Z: Undo
  • CTRL+B: Bold
  • CTRL+U: Underline
  • CTRL+I: Italic

Mouse click/keyboard modifier combinations for shell objects

  • SHIFT+right click: Displays a shortcut menu containing alternative commands
  • SHIFT+double click: Runs the alternate default command (the second item on the menu)
  • ALT+double click: Displays properties
  • SHIFT+DELETE: Deletes an item immediately without placing it in the Recycle Bin

General keyboard-only commands

  • F1: Starts Windows Help
  • F10: Activates menu bar options
  • SHIFT+F10 Opens a shortcut menu for the selected item (this is the same as right-clicking an object
  • CTRL+ESC: Opens the Start menu (use the ARROW keys to select an item)
  • CTRL+ESC or ESC: Selects the Start button (press TAB to select the taskbar, or press SHIFT+F10 for a context menu)
  • CTRL+SHIFT+ESC: Opens Windows Task Manager
  • ALT+DOWN ARROW: Opens a drop-down list box
  • ALT+TAB: Switch to another running program (hold down the ALT key and then press the TAB key to view the task-switching window)
  • SHIFT: Press and hold down the SHIFT key while you insert a CD-ROM to bypass the automatic-run feature
  • ALT+SPACE: Displays the main window's System menu (from the System menu, you can restore, move, resize, minimize, maximize, or close the window)
  • ALT+- (ALT+hyphen): Displays the Multiple Document Interface (MDI) child window's System menu (from the MDI child window's System menu, you can restore, move, resize, minimize, maximize, or close the child window)
  • CTRL+TAB: Switch to the next child window of a Multiple Document Interface (MDI) program
  • ALT+underlined letter in menu: Opens the menu
  • ALT+F4: Closes the current window
  • CTRL+F4: Closes the current Multiple Document Interface (MDI) window
  • ALT+F6: Switch between multiple windows in the same program (for example, when the Notepad Find dialog box is displayed, ALT+F6 switches between the Find dialog box and the main Notepad window)

Shell objects and general folder/Windows Explorer shortcuts

For a selected object:

  • F2: Rename object
  • F3: Find all files
  • CTRL+X: Cut
  • CTRL+C: Copy
  • CTRL+V: Paste
  • SHIFT+DELETE: Delete selection immediately, without moving the item to the Recycle Bin
  • ALT+ENTER: Open the properties for the selected object

To copy a file

Press and hold down the CTRL key while you drag the file to another folder.

To create a shortcut

Press and hold down CTRL+SHIFT while you drag a file to the desktop or a folder.

General folder/shortcut control

  • F4: Selects the Go To A Different Folder box and moves down the entries in the box (if the toolbar is active in Windows Explorer)
  • F5: Refreshes the current window.
  • F6: Moves among panes in Windows Explorer
  • CTRL+G: Opens the Go To Folder tool (in Windows 95 Windows Explorer only)
  • CTRL+Z: Undo the last command
  • CTRL+A: Select all the items in the current window
  • BACKSPACE: Switch to the parent folder
  • SHIFT+click+Close button: For folders, close the current folder plus all parent folders

Windows Explorer tree control

  • Numeric Keypad *: Expands everything under the current selection
  • Numeric Keypad +: Expands the current selection
  • Numeric Keypad -: Collapses the current selection.
  • RIGHT ARROW: Expands the current selection if it is not expanded, otherwise goes to the first child
  • LEFT ARROW: Collapses the current selection if it is expanded, otherwise goes to the parent

Properties control

  • CTRL+TAB/CTRL+SHIFT+TAB: Move through the property tabs

Accessibility shortcuts

  • Press SHIFT five times: Toggles StickyKeys on and off
  • Press down and hold the right SHIFT key for eight seconds: Toggles FilterKeys on and off
  • Press down and hold the NUM LOCK key for five seconds: Toggles ToggleKeys on and off
  • Left ALT+left SHIFT+NUM LOCK: Toggles MouseKeys on and off
  • Left ALT+left SHIFT+PRINT SCREEN: Toggles high contrast on and off

Microsoft Natural Keyboard keys

  • Windows Logo: Start menu
  • Windows Logo+R: Run dialog box
  • Windows Logo+M: Minimize all
  • SHIFT+Windows Logo+M: Undo minimize all
  • Windows Logo+F1: Help
  • Windows Logo+E: Windows Explorer
  • Windows Logo+F: Find files or folders
  • Windows Logo+D: Minimizes all open windows and displays the desktop
  • CTRL+Windows Logo+F: Find computer
  • CTRL+Windows Logo+TAB: Moves focus from Start, to the Quick Launch toolbar, to the system tray (use RIGHT ARROW or LEFT ARROW to move focus to items on the Quick Launch toolbar and the system tray)
  • Windows Logo+TAB: Cycle through taskbar buttons
  • Windows Logo+Break: System Properties dialog box
  • Application key: Displays a shortcut menu for the selected item

Microsoft Natural Keyboard with IntelliType software installed

  • Windows Logo+L: Log off Windows
  • Windows Logo+P: Starts Print Manager
  • Windows Logo+C: Opens Control Panel
  • Windows Logo+V: Starts Clipboard
  • Windows Logo+K: Opens Keyboard Properties dialog box
  • Windows Logo+I: Opens Mouse Properties dialog box
  • Windows Logo+A: Starts Accessibility Options (if installed)
  • Windows Logo+SPACEBAR: Displays the list of Microsoft IntelliType shortcut keys
  • Windows Logo+S: Toggles CAPS LOCK on and off

Dialog box keyboard commands

  • TAB: Move to the next control in the dialog box
  • SHIFT+TAB: Move to the previous control in the dialog box
  • SPACEBAR: If the current control is a button, this clicks the button. If the current control is a check box, this toggles the check box. If the current control is an option, this selects the option.
  • ENTER: Equivalent to clicking the selected button (the button with the outline)
  • ESC: Equivalent to clicking the Cancel button
  • ALT+underlined letter in dialog box item: Move to the corresponding item

Source: 

The Xbox 360 Wireless Gaming Receiver for Windows lets you connect up to four wireless headsets and four wireless controllers to a computer running Microsoft Windows XP with Service Pack (SP2) or a later version of Windows.

Note The receiver is not intended for use with an Xbox 360 console.

Step 1: Connect the Xbox 360 Wireless Gaming Receiver to your computer
  1. Remove the green label from the USB connector on the receiver.
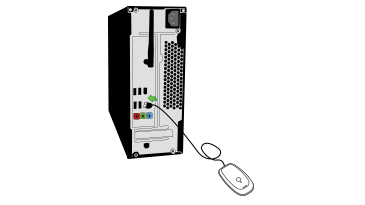
  2. Insert the USB connector into a powered USB 2.0 port on the computer.
     
picture   picture

Note The USB ports on the front of your computer are probably not powered USB 2.0 ports. Try using the ports on the back of your computer.

A green light on the receiver indicates that the unit is working.

  1. If the Add New Hardware Wizard starts automatically, select Install the software automatically (Recommended), and then click Next. If the wizard installs the software successfully, click Finish and then skip to Step 3: Connect an Xbox 360 wireless accessory to your computer, below.

If the wizard fails to install the software, continue with the next section.

Step 2: Install the Xbox Receiver software

Note Before you can use wireless accessories with your computer, you might need to install some software on your computer.

If you have the installation disc that came with your Xbox 360 Wireless Gaming Receiver, you can install the software from that disc.

To install the software from disc
  1. Insert the installation disc into the CD or DVD drive of your computer. If the Setup program does not automatically start, change to your CD or DVD drive, and then run the Setup program.
  2. Follow the steps in the wizard to install the software.

Note You might be prompted to restart the computer.

Step 3: Connect an Xbox 360 wireless accessory to your computer

  1. Turn on the Xbox 360 wireless accessory that you want to use with your receiver.

For example, to turn on a controller, press and hold the Guide button in the middle of the controller. If you do not know how to turn on the accessory, read the documentation for that accessory.

picture
 
  1. On the receiver, press the connect button. The light flashes green.
picture
 
  1. On the wireless accessory, press the connect button. For example, on the controller, the connect button is on the back.
picture
 

Green flashing lights on the accessory and on the receiver indicate that the device is trying to establish a connection. When the lights stop flashing and remain lit, the accessory is connected. For example, on a wireless controller, one of the lights around the Guide button will remain lit.

picture


Troubleshooting the Xbox 360 Wireless Gaming Receiver

The green light on the receiver does not illuminate

When you plug the Xbox 360 Wireless Gaming Receiver for Windows into a USB 2.0 port, the green light on the Xbox 360 Wireless Gaming Receiver for Windows does not light up. This can occur for any of the following reasons:

  • The Xbox 360 Wireless Gaming Receiver for Windows is not plugged correctly into the USB port.
  • The Xbox 360 Wireless Gaming Receiver for Windows device driver is not working as expected, or the driver is out of date.
  • The USB hub is overloaded.

Important The Xbox 360 Wireless Gaming Receiver for Windows is designed for use on a computer that is running Microsoft Windows XP with Service Pack 1 (SP1) or a later version of Windows and that has a powered USB 2.0 port.


Solutions

  • Verify the USB Connection. Here’s how: First examine the USB connection of the Xbox 360 Wireless Gaming Receiver for Windows. Make sure that you've connected the Xbox 360 Wireless Gaming Receiver for Windows to a powered USB 2.0 port on the computer. The best way to verify the connection is to unplug the Xbox 360 Wireless Gaming Receiver for Windows from the USB port, and then plug the receiver back in. If the light still doesn't illuminate, try connecting the receiver to a different USB 2.0 port on the computer.
  • Verify the device driver. The following steps will help you verify that the device driver for your Xbox 360 Wireless Gaming Receiver for Windows is working correctly and that you have the latest device driver.
    1. Open Device Manager. To do this, follow these steps:

      For all versions of Windows 8 and Windows RT

      1. Swipe in from the right edge of the screen, and then tap Search. Or, if you’re using a mouse, point to the lower-right corner of the screen, and then click Search.
      2. Type devmgmt.msc, and then tap or click Device Manager in the search results.

      For all versions of Windows 7 and Windows Vista

      1. Click Start, and then click Run.
      2. Type devmgmt.msc in the Run box, and then click OK.
    2. In the list of different devices, locate the entry for XBOX 360 Peripherals.
    3. To the left of XBOX 360 Peripherals entry, locate and click the plus sign (+). The entry should expand to show all the peripheral devices for Xbox 360 that are attached to the computer.
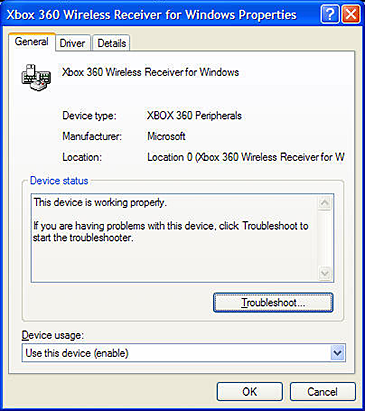
    4. Locate and then double-click the Xbox 360 Wireless Receiver for Windows entry. The Xbox 360 Wireless Receiver for Windows Properties dialog box opens.
    5. Verify that the following screen appears and that the Device status area displays the text, "This device is working properly."
picture
 

If the device does not appear in Device Manager or if the Device status area does not indicate that the device is working, verify that the software is installed correctly. See the section “Step 3: Connect an Xbox 360 wireless accessory to your computer,” earlier on this page.

  • Verify the USB port device. If you have the Xbox 360 Wireless Gaming Receiver for Windows device plugged into a USB hub together with other USB devices, it’s possible that the USB hub can’t provide sufficient power for all the devices that are plugged into it.

    Note The ports on the back of a PC are typically powered ports. The ports on the front of a PC may not be powered ports. Additionally, an external USB hub does not provide powered ports if it doesn’t have its own separate power supply/AC adapter.

    To avoid exceeding the amount of power that the USB hub can provide, follow these steps:

    1. Connect the Xbox 360 Wireless Gaming Receiver for Windows directly to a powered USB 2.0 port on the back of the computer.
    2. Verify that the green light on the Xbox 360 Wireless Gaming Receiver for Windows lights up.

    If these steps resolve the problem, we recommend that you move the other USB powered devices to a powered USB 2.0 hub.

  •  


Source: 

How to use this chart

You can use the html name or number codes in an HTML document (i.e. a webpage or an e-mail that uses HTML format.)

For Macintosh: press the keys as shown. for example “shift+option+w” means press down the shift key, the option key, and the w key all at the same time. “option+e E” means press down theoption key and the e key at the same time, then press the E key (capital E).


Western european special characters and how to enter them from your keyboard
HTML Name CodeHTML Number CodeGlyphMacOSWindowsDescription
‘ ‘ option+] Alt+0145 left single quote
’ ’ shift+option+] Alt+0146 right single quote
‚ ‚     single low-9 quote
“ “ option+[ Alt+0147 left double quote
” ” shift+option+[ Alt+0148 right double quote
„ „ shift+option+w   double low-9 quote
† † option+t Alt+0134 dagger
‡ ‡ shift+option+7 Alt+0135 double dagger
  … option+;   horizontal ellipsis
‰ ‰ shift+option+r Alt+0137 per mill sign
‹ ‹ shift+option+3 Alt+0139 single left-pointing angle quote
› › shift+option+4 Alt+0155 single right-pointing angle quote
♠ ♠     black spade suit
♣ ♣     black club suit
♥ ♥     black heart suit
♦ ♦     black diamond suit
‾ ‾     overline, = spacing overscore
← ←     leftward arrow
↑ ↑     upward arrow
→ →     rightward arrow
↓ ↓     downward arrow
™ ™ option+2 Alt+0153 trademark sign
" " "     double quotation mark
& & &     ampersand
&lt; &#60; <     less-than sign
&gt; &#62; >     greater-than sign
  &#91; [     left square bracket
  &#93; ]     right square bracket
&ndash; &#150; option+hyphen Alt+0150 en dash
&mdash; &#151; shift+option+hyphen Alt+0151 em dash
&nbsp; &#160;     Alt+0160 nonbreaking space
&iexcl; &#161; ¡ option+1 Alt+0161 inverted exclamation
&cent; &#162; ¢ option+4 Alt+0162 cent sign
&pound; &#163; £ option+3 Alt+0163 pound sterling
&curren; &#164; ¤   Alt+0164 general currency sign
&yen; &#165; ¥ option+y Alt+0165 yen sign
&brvbar; or &brkbar; &#166; ¦   Alt+0166 broken vertical bar
&sect; &#167; § option+6 Alt+0167 section sign
&uml; or &die; &#168; ¨ shift+option+u Alt+0168 umlaut
&copy; &#169; © option+g Alt+0169 copyright
&ordf; &#170; ª option+9 Alt+0170 feminine ordinal
&laquo; &#171; « option+\ Alt+0171 left angle quote
&not; &#172; ¬ option+l Alt+0172 not sign
&shy; &#173;     Alt+0173 soft hyphen
&reg; &#174; ® option+r Alt+0174 registered trademark
&macr; or &hibar; &#175; ¯   Alt+0175 macron accent
&deg; &#176; ° shift+option+8 Alt+0176 degree sign
&plusmn; &#177; ± shift+option+= Alt+0177 plus or minus
&sup2; &#178; ²   Alt+0178 superscript two
&sup3; &#179; ³   Alt+0179 superscript three
&acute; &#180; ´ shift+option+e Alt+0180 acute accent
&micro; &#181; µ option+m Alt+0181 micro sign
&para; &#182; option+7 Alt+0182 paragraph sign
&middot; &#183; · shift+option+9 Alt+0183 middle dot
&cedil; &#184; ¸ shift+option+z Alt+0184 cedilla
&sup1; &#185; ¹   Alt+0185 superscript one
&ordm; &#186; º option+0 Alt+0186 masculine ordinal
&raquo; &#187; » shift+option+\ Alt+0187 right angle quote
&frac14; &#188; ¼   Alt+0188 one-fourth
&frac12; &#189; ½   Alt+0189 one-half
&frac34; &#190; ¾   Alt+0190 three-fourths
&iquest; &#191; ¿ shift+option+? Alt+0191 inverted question mark
&Agrave; &#192; À option+` A Alt+0192 uppercase A, grave accent
&Aacute; &#193; Á option+e A Alt+0193 uppercase A, acute accent
&Acirc; &#194; Â option+i A Alt+0194 uppercase A, circumflex accent
&Atilde; &#195; Ã option+n A Alt+0195 uppercase A, tilde
&Auml; &#196; Ä option+u A Alt+0196 uppercase A, umlaut
&Aring; &#197; Å shift+option+a Alt+0197 uppercase A, ring
&AElig; &#198; Æ shift+option+' Alt+0198 uppercase AE
&Ccedil; &#199; Ç shift+option+c Alt+0199 uppercase C, cedilla
&Egrave; &#200; È option+` E Alt+0200 uppercase E, grave accent
&Eacute; &#201; É option+e E Alt+0201 uppercase E, acute accent
&Ecirc; &#202; Ê option+i E Alt+0202 uppercase E, circumflex accent
&Euml; &#203; Ë option+u E Alt+0203 uppercase E, umlaut
&Igrave; &#204; Ì option+` I Alt+0204 uppercase I, grave accent
&Iacute; &#205; Í option+e I Alt+0205 uppercase I, acute accent
&Icirc; &#206; Î option+i I Alt+0206 uppercase I, circumflex accent
&Iuml; &#207; Ï option+u I Alt+0207 uppercase I, umlaut
&ETH; &#208; Ð   Alt+0208 uppercase Eth, Icelandic
&Ntilde; &#209; Ñ option+n N Alt+0209 uppercase N, tilde
&Ograve; &#210; Ò option+` O Alt+0210 uppercase O, grave accent
&Oacute; &#211; Ó option+e O Alt+0211 uppercase O, acute accent
&Ocirc; &#212; Ô option+i O Alt+0212 uppercase O, circumflex accent
&Otilde; &#213; Õ option+n O Alt+0213 uppercase O, tilde
&Ouml; &#214; Ö option+u O Alt+0214 uppercase O, umlaut
&times; &#215; ×   Alt+0215 multiplication sign
&Oslash; &#216; Ø shift+option+o Alt+0216 uppercase O, slash
&Ugrave; &#217; Ù option+` U Alt+0217 uppercase U, grave accent
&Uacute; &#218; Ú option+e U Alt+0218 uppercase U, acute accent
&Ucirc; &#219; Û option+i U Alt+0219 uppercase U, circumflex accent
&Uuml; &#220; Ü option+u U Alt+0220 uppercase U, umlaut
&Yacute; &#221; Ý   Alt+0221 uppercase Y, acute accent
&THORN; &#222; Þ   Alt+0222 uppercase THORN, Icelandic
&szlig; &#223; ß option+s Alt+0223 lowercase sharps, German
&agrave; &#224; à option+` a Alt+0224 lowercase a, grave accent
&aacute; &#225; á option+e a Alt+0225 lowercase a, acute accent
&acirc; &#226; â option+i a Alt+0226 lowercase a, circumflex accent
&atilde; &#227; ã option+n a Alt+0227 lowercase a, tilde
&auml; &#228; ä option+u a Alt+0228 lowercase a, umlaut
&aring; &#229; å option+a Alt+0229 lowercase a, ring
&aelig; &#230; æ option+' Alt+0230 lowercase ae
&ccedil; &#231; ç option+c Alt+0231 lowercase c, cedilla
&egrave; &#232; è option+` e Alt+0232 lowercase e, grave accent
&eacute; &#233; é option+e e Alt+0233 lowercase e, acute accent
&ecirc; &#234; ê option+i e Alt+0234 lowercase e, circumflex accent
&euml; &#235; ë option+u e Alt+0235 lowercase e, umlaut
&igrave; &#236; ì option+` i Alt+0236 lowercase i, grave accent
&iacute; &#237; í option+e i Alt+0237 lowercase i, acute accent
&icirc; &#238; î option+i i Alt+0238 lowercase i, circumflex accent
&iuml; &#239; ï option+u i Alt+0239 lowercase i, umlaut
&eth; &#240; ð   Alt+0240 lowercase eth, Icelandic
&ntilde; &#241; ñ option+n n Alt+0241 lowercase n, tilde
&ograve; &#242; ò option+` o Alt+0242 lowercase o, grave accent
&oacute; &#243; ó option+e o Alt+0243 lowercase o, acute accent
&ocirc; &#244; ô option+i o Alt+0244 lowercase o, circumflex accent
&otilde; &#245; õ option+n o Alt+0245 lowercase o, tilde
&ouml; &#246; ö option+u o Alt+0246 lowercase o, umlaut
&divide; &#247; ÷   Alt+0247 division sign
&oslash; &#248; ø option+o Alt+0248 lowercase o, slash
&ugrave; &#249; ù option+` u Alt+0249 lowercase u, grave accent
&uacute; &#250; ú option+e u Alt+0250 lowercase u, acute accent
&ucirc; &#251; û option+i u Alt+0251 lowercase u, circumflex accent
&uuml; &#252; ü option+u u Alt+0252 lowercase u, umlaut
&yacute; &#253; ý   Alt+0253 lowercase y, acute accent
&thorn; &#254; þ   Alt+0254 lowercase thorn, Icelandic
&yuml; &#255; ÿ option+u y Alt+0255
Go to top